
The first race t-shirt you ever received, the shirt you wore the day you ran your furthest, or your dad’s old college football sweatshirt – so loved that it’s falling apart! Our clothes are with us during special times throughout life, and exercise apparel is no different. But unfortunately, you outgrow, wear through, or even grow tired of your old workout shirts. Instead of filling up your basement or making a trip to Goodwill, why not preserve these treasures in a unique and creative way. Create a t-shirt quilt with your favorites to maintain memories and enjoy them in a whole new way.
You will need:
- 25 shirts or sweatshirts (tanks are too small to use)
- A queen sized sheet in your favorite color (flat not the kind with elastic around the corners)
- Sewing Machine (yes, basic sewing knowledge is needed)
- White Thread
- Scissors
- Poster Board
- Yardstick
- Large workspace, large area of carpet or flat flooring would work best
1. Start by taking the poster board and measuring out a square that is 16 inch by 16 inch using your yardstick. Cut out this square, and use it as your measuring device.
2. Place the square over your first t-shirt that has been spread out. Be sure to position the square over the logo that you want to be on the quilt. Note that any part of the logo peeking out of the square will not be on the quilt.

Photo Credit: totallystitchin.net
3. After repeating this step for each of your t-shirts, you now should have 25 16×16 squares cut and ready to be assembled. If you like the front and back of a shirt, you may use both sides to make two different squares. This just means you won’t need 25 shirts. Try to choose shirts that mean something to you, but also vary in color to give your quilt a pop of color. Old jerseys work great! The finished product will measure 75” x 75”.
4. Arrange the squares on the floor, going 5 shirts down and 5 shirts across (5 rows and 5 columns). Be sure to try out different arrangements until you find the perfect combinations of shirts (avoid having three of the same colored shirt together).

Photo Credit: totallystitchin.net
5. After you have your quilt arranged on the floor, pick up squares 1 and 2 (Batman Shirt and Blue Shirt with White Wording). You will be sewing one single row together first, and then sewing each row together to make your 5 columns. Pin the good sides, or logo side of the two squares together. Sew square 1 to square 2 together in a straight line using about a1 inch seam.

Photo Credit: totallystitchin.net
6. Pick up square 3 (green e^4 shirt) and place logo sides together with square 2 (Blue shirt). Again, sew in a straight line connecting these two squares. Repeat this process until you have connected squares 1-5. You should have a string of shirts connected now!

Photo Credit: totallystitchin.net
7. Set that row back down on the floor for now, you will need it again later. You are ready to move on to row 2 now. Repeat the exact same process as you did with the first row for the next four rows.

Photo Credit: totallystitchin.net
8. Now, that you have 5 rows of 5 shirts connected, it’s time to connect these 5 rows together. Again, with logo sides facing each other, and row one’s top matching up with row two’s bottom, place row two on top of row one and use the same seam inch measurement to run a straight line down your shirts with the sewing machine. This will connect rows one and two together.

Photo Credit: totallystitchin.net
9. Again, repeat for the last two rows. Now all of your shirts should be connected and starting to look like a quilt!
10. But you will notice the back of your quilt shows the stitching, extra fabric, and other imperfections that make your quilt look unfinished. This is where the bed sheet comes into play. Place the sheet, on top of your quilt. Trim the sheet if needed, so that it perfectly matches up with the t-shirt side.

Photo Credit: totallystitchin.net
11. Just like the squares, the two nice sides (or the logo side of your quilt and the nice side of your sheet) should be touching each other and facing in where you can’t see them)
12. Take your sewing machine and run a stitch 1-inch stitch all the way around the perimeter of the quilt, leaving about a 15-inch area open at the end.
13. Reach your hand inside the quilt and pull the good, logo side through the hole.
14. This leaves your edges of your quilt looking finished and professional, and hides the one-inch seam you just sewed and turned inside the blanket. Finally, give that 15-inch hole a quick, rough hand stitching that will help to close up the gap and finish up the quilt.

Photo Credit: totallystitchin.net
15. While it may seem like a lot of steps, the finished product is extremely cool! Nothing about this craft is super challenging, so anyone can do it. It just takes a little time and effort. But what an amazing way to display your beloved workout shirts and keep them forever! So curl up with your new, comfy t-shirt quilt and let the shirts spark stories and memories about some of the greatest sports and fitness moments.
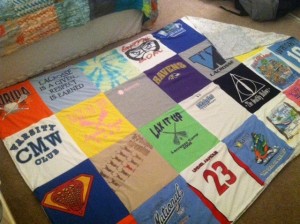
16. Here is a picture of my quilt, where I chose to do a 7 shirt by 4 shirt dimension.

Photo Credit: Cara Canington
The above pictures were all courtesy of our friends at totallysticthen.net.


I love the quilt! Thanks for the great info. Did you use interfacing on the back of the T-shirts?